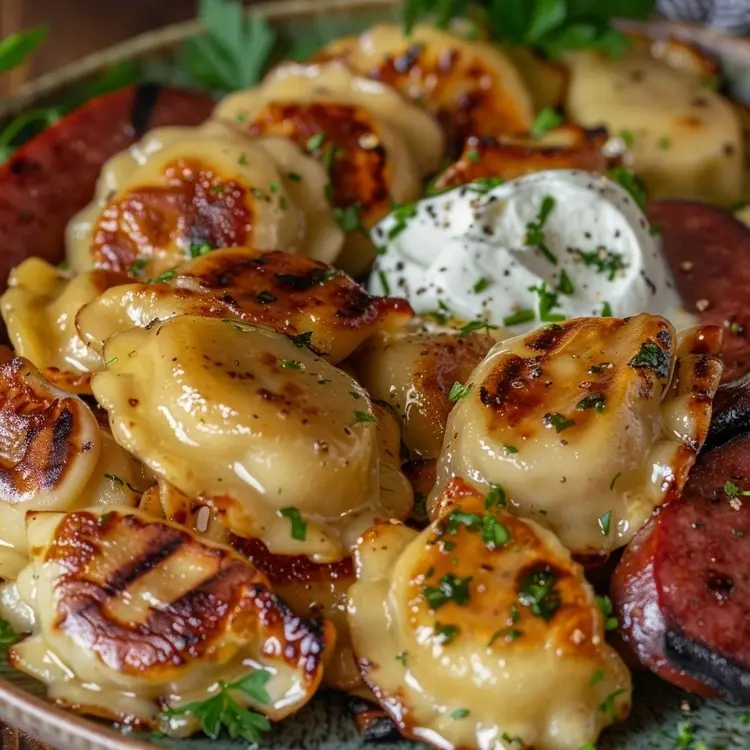
What if we told you there’s a way to unlock a whole new level of flavor for your Grilled Pierogies and Kielbasa? This recipe takes your favorite Polish street food and gives it a makeover fit for a backyard barbecue.
Get ready for Grilled Pierogies and Kielbasa! This recipe infuses your pierogi with a delightful smoky char and pairs them perfectly with grilled kielbasa.
It’s an easy weeknight meal that’s bursting with flavor and perfect for summertime grilling. So ditch the ordinary and get ready to experience the magic of grilled pierogies and kielbasa!
Smoky Goodness in 5 Steps
- Grill kielbasa
- Grill pierogi (or pre-boil for thicker varieties)
- Make vinaigrette (optional)
- Toss everything together
- Serve with sour cream

Table of contents
- What Makes This Grilled Pierogies and Kielbasa Recipe Unique?
- Introduction
- Ingredients
- Instructions
- Tips and Variations
- Nutrition Information for Grilled Pierogies and Kielbasa
- My Notes on Grilled Pierogies and Kielbasa
- Conclusion: Take Your Pierogi and Kielbasa Game to the Next Level!
- FAQs: Grilled Pierogies and Kielbasa
What Makes This Grilled Pierogies and Kielbasa Recipe Unique?
Ever craved a way to take your love for pierogies and kielbasa to the next level? This recipe does exactly that, offering a unique twist on a classic comfort food. But what exactly sets it apart?
- Smoky Magic: Grilling unlocks a whole new dimension of flavor! The grilled pierogies and kielbasa take on a delightful smoky depth that’s sure to tantalize your taste buds. This smoky element adds a complexity you won’t find in traditional boiled pierogi dishes.
- Crispy on the Outside, Pillowy on the Inside: The beauty of grilling pierogies is the textural contrast they achieve. The exteriors develop a satisfying crispness, while the interiors remain soft and pillowy, perfectly cradling the delicious fillings.
- Simple Yet Versatile: This recipe is deceptively simple, requiring minimal ingredients and prep work. Is vegetarian or lighter fare more your style? No problem! We offer tips for healthy variations using lighter fillings and lean protein.
- Endless Flavor Combinations: The beauty lies in the customizability! Experiment with different pierogi fillings, kielbasa varieties, and even the vinaigrette for a truly personalized dish.
So, what are you waiting for? Fire up your grill and get ready to experience the unique magic of grilled pierogies and kielbasa! We guarantee it’ll become a new favorite for you and your family.
Have you ever tried grilling pierogies before? Let me know in the comments below what unique flavor combinations you’re excited to try!
Introduction
Craving a hearty and flavorful meal that’s bursting with smoky goodness? Look no further than grilled pierogies and kielbasa! This dynamic duo is a match made in culinary heaven, offering up a delightful combination of textures and tastes.
But wait, have you ever grilled pierogies before? Believe it or not, these little pockets of deliciousness get a whole new lease on life when kissed by the flames. The result? Crispy, golden brown exteriors enveloping pillowy soft dough and savory fillings, all infused with a subtle smoky depth.
This recipe has become a staple in my household. It all started years ago when I was visiting a friend’s family in Poland. Her grandmother, a true kitchen magician, whipped up a batch of grillowane pierogi z kiełbasą (that’s Polish for grilled pierogies with kielbasa) and it was a revelation! Now, it’s a dish I love to make for my own family and friends.
Ready to embark on this delicious grilling adventure? Let’s dive into the simple steps to create this crowd-pleasing dish at home.
For health-conscious readers, this recipe is surprisingly versatile! You can choose lighter fillings for the pierogies, like potato and low-fat cheese, or opt for turkey kielbasa. We’ll explore these options and more in the coming sections. So, grab your grill tongs, fire up the flames, and get ready to experience the magic of grilled pierogies and kielbasa!
Don’t Miss my other delicious recipes:
Crockpot Pierogies With Kielbasa Recipe: Weeknight Dinner Win!
Kielbasa Recipes: Your Ultimate Guide
Turkey Kielbasa: Beyond the Ordinary Sausage!
Ingredients
Now that your taste buds are tingling for this smoky delight, let’s gather the ingredients! The beauty of grilled pierogies and kielbasa lies in its simplicity. Do you have a favorite type of kielbasa? Smoked or Polish-style work beautifully here.
Here’s a quick shopping list to get you started:
- For the Pierogies and Kielbasa:
- 1 pound kielbasa: Look for a variety you enjoy, smoked or Polish-style are great choices.
- 1 (16-ounce) package frozen pierogies: While potato and cheddar are classic, feel free to explore different fillings! We’ll discuss some fun variations later.
- Extra virgin olive oil: A touch of high-quality olive oil helps achieve those crispy exteriors.
- Salt and freshly ground black pepper: Seasoning is key to unlocking the full flavor potential of this dish.
- For the Mustard Vinaigrette (Optional):
- Dijon mustard: This tangy mustard adds a delightful bite to the vinaigrette.
- Apple cider vinegar: A touch of acidity balances the richness of the kielbasa and pierogies.
- Extra virgin olive oil: The base of our flavorful vinaigrette.
- Chopped fresh parsley: A sprinkle of fresh herbs adds a pop of color and freshness.
Feeling adventurous? We’ll explore some optional add-ins in the next section, like colorful bell peppers and juicy mushrooms, to take your grilled pierogies and kielbasa to the next level!
Instructions
Alright, grill masters and pierogi enthusiasts, it’s time to get cooking! Here’s how to transform your grilled pierogies and kielbasa from recipe to reality.

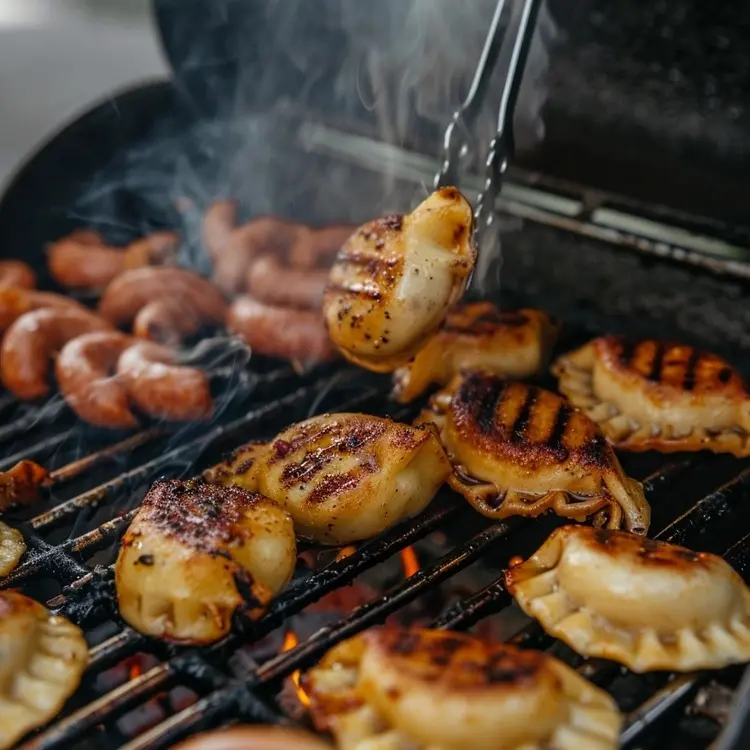
First things first, fire up your grill! Aim for medium heat – that’s the sweet spot for achieving beautiful char marks without burning. Don’t have a grill? No worries! You can still achieve delicious results using a grill pan or even a stovetop skillet.
Now, let’s tackle the stars of the show:
- The Mighty Kielbasa: Grill your kielbasa sausages until they’re nice and browned on all sides. This usually takes about 8-10 minutes. Once cooked through, set them aside on a plate.
- The Charred and Cheesy Pierogies: We want those pierogies to be crispy on the outside and perfectly heated through.
Here’s a chef’s tip: For thicker pierogies, consider pre-boiling them for 2-3 minutes before grilling. This ensures even cooking.
Here are two ways to grill your pierogies:
Method 1: Straight from Frozen: Toss your frozen pierogies with a generous drizzle of olive oil and season them with salt and pepper. Place them directly on the preheated grill and cook for 5-7 minutes per side, or until they’re golden brown and heated through.
Method 2: With a Smoky Onion Twist: Feeling fancy? Thinly slice a red onion and toss it with the olive oil, salt, and pepper alongside your frozen pierogies. Grill both the pierogies and onions for 5-7 minutes per side, stirring occasionally, until everything is beautifully caramelized and cooked through.
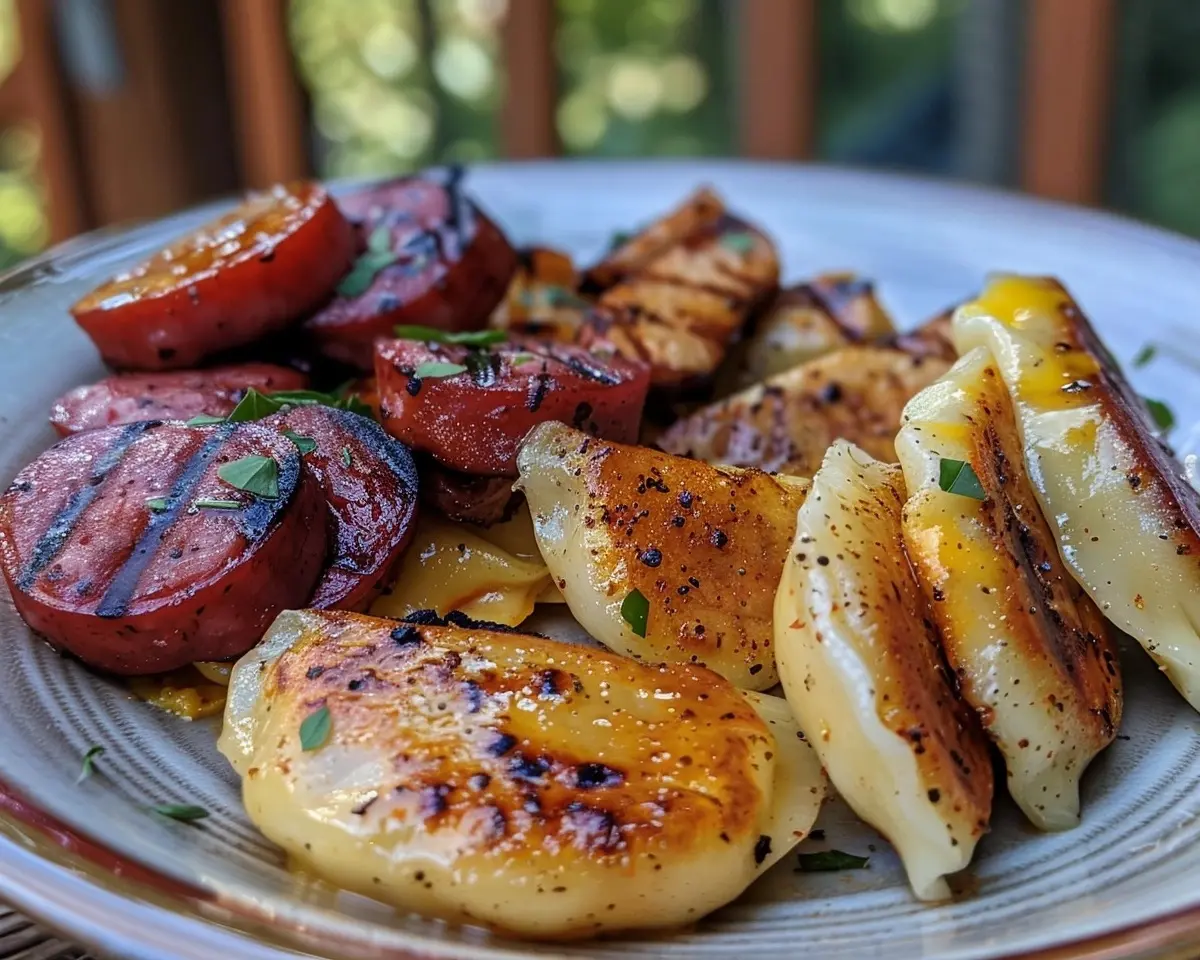
Now, let’s assemble this flavor bomb! Slice the cooked kielbasa into bite-sized pieces. In a large bowl, combine the grilled pierogies (and onions, if using), sliced kielbasa, and your favorite vinaigrette (see next section for a simple recipe).
Toss everything together until well coated, then garnish with a sprinkle of fresh parsley.
Voila! Your masterpiece of grilled pierogies and kielbasa is ready to devour. Serve it hot with a dollop of sour cream on the side for a truly decadent experience.
Do you have a favorite way to serve grilled pierogies and kielbasa? Share your variations and comments below – I love hearing from fellow food enthusiasts!
Also, Here is an amazing Kielbasa Stir-Fry ready in 30-Minute
Tips and Variations
Ready to take your grilled pierogies and kielbasa to the next level? Here are some handy tips and variations to explore:

- Perfect Pierogies: Want to ensure your pierogies cook evenly? For thicker varieties, pre-boil them for 2-3 minutes before grilling. This simple step makes a big difference!
- Flavor Boost: Craving extra oomph? Sprinkle your pierogies with dried herbs like thyme or oregano before grilling. Explore different flavor combinations to find your favorites!
- Vinaigrette Variations: The provided vinaigrette is a delicious base, but feel free to experiment! Try a creamy Dijon vinaigrette with a dollop of sour cream for a richer taste, or a honey mustard vinaigrette for a touch of sweetness.
- Healthy Twists: Catering to health-conscious eaters? Choose lighter pierogi fillings like potato and low-fat cheese. Turkey kielbasa is another healthy substitute for traditional kielbasa.
Let’s get creative! Do you have any favorite add-ins for your grilled pierogies and kielbasa? Share them in the comments below – I’m always on the lookout for new and exciting flavor combinations!
Nutrition Information for Grilled Pierogies and Kielbasa
Curious about the nutritional content of this delicious dish? While the exact calorie count can vary depending on the specific ingredients you use, here’s a general breakdown:
- Grilled pierogies and kielbasa is a hearty and satisfying meal, so keep in mind it will pack a bit of a caloric punch.
- A typical serving can range from 500 to 700 calories depending on the size and type of kielbasa, pierogi filling, and amount of olive oil used.
Here are some tips for making a lighter version of grilled pierogies and kielbasa:
- Choose lean protein: Opt for turkey kielbasa instead of traditional kielbasa.
- Lighten up the pierogi filling: Select options like potato and low-fat cheese or sauerkraut.
- Go easy on the oil: Use a mister to lightly coat the pierogies before grilling instead of drizzling with olive oil.
Remember, portion control is key! While this dish can be enjoyed as part of a balanced diet, be mindful of serving sizes.
Do you have any tips for making healthy variations of grilled pierogies and kielbasa? Share them in the comments below – I’d love to hear your healthy recipe hacks!
My Notes on Grilled Pierogies and Kielbasa
This recipe for grilled pierogies and kielbasa is a winner in my book! It’s a fun twist on a classic dish that’s sure to become a new favorite.
Here are some quick takeaways to keep in mind:
- Grilling is key: The smoky kiss from the grill adds a whole new dimension of flavor to both the pierogies and kielbasa.
- Don’t be afraid to experiment: Feel free to explore different pierogi fillings, kielbasa varieties, and vinaigrette combinations to personalize the recipe to your taste.
- Catering to health-conscious eaters? No problem! Use lighter fillings, lean protein, and a minimal amount of oil for a guilt-free indulgence.
I’d love to hear from you! Have you tried grilled pierogies and kielbasa before? What are your favorite variations or add-ins? Leave a comment below and share your grilling adventures!
Conclusion: Take Your Pierogi and Kielbasa Game to the Next Level!
There you have it! This recipe for grilled pierogies and kielbasa is a flavor explosion waiting to happen. It’s the perfect way to elevate your love for this classic comfort food.
Ready to impress your friends and family with your grilling skills? Fire up the grill, grab your ingredients, and get ready to create this crowd-pleasing dish.
But this is just the beginning! The beauty of this recipe lies in its versatility. Don’t be afraid to experiment with different fillings, sausages, and flavor combinations to personalize it to your taste.
So, tell me, what are you waiting for? Share your grilled pierogi and kielbasa creations with me on social media using #GrilledPierogiLove! I can’t wait to see your culinary masterpieces.
In the meantime, happy grilling! And remember, if you have any questions or recipe hacks, leave a comment below – I’m always happy to hear from fellow food enthusiasts
FAQs: Grilled Pierogies and Kielbasa
Craving some answers about grilled pierogies and kielbasa? Look no further! Here are some commonly asked questions to help you master this delicious dish:
(Yes!) Absolutely! Branch out from the classic potato and cheddar. Explore options like sauerkraut and mushroom, or even sweet fillings like blueberry or cherry for a unique dessert twist.
(Any grill works!) The beauty of this recipe is its versatility. Any type of grill will work, from a charcoal grill for a deeper smoky flavor to a gas grill for convenient heat control.
(Sure!) Of course! If you don’t have kielbasa on hand, try smoked sausage, chorizo, or even Italian sausage for a different flavor profile.
(Look for golden perfection!) You’ll know your pierogies are ready to devour when they have beautiful golden brown grill marks and the filling is heated through.
Do you have any other burning questions about grilled pierogies and kielbasa? Leave a comment below and I’ll be happy to help! Remember, the kitchen is your playground – don’t be afraid to experiment and create your own delicious variations.
Now that you’re armed with this grilling knowledge, fire up your grill and get ready to experience the magic of grilled pierogies and kielbasa! Share your culinary creations with me on social media, and tag me using #GrilledPierogiLove!
Print
Grilled Pierogies and Kielbasa Recipe
- Total Time: 30 minutes
- Yield: 4 servings 1x
Description
This recipe takes your favorite Polish street food and gives it a makeover fit for a backyard barbecue.
Get ready for Grilled Pierogies and Kielbasa! This recipe infuses your pierogi with a delightful smoky char and pairs them perfectly with grilled kielbasa.
It’s an easy weeknight meal that’s bursting with flavor and perfect for summertime grilling. So ditch the ordinary and get ready to experience the magic of grilled pierogies and kielbasa!
Ingredients
For the Pierogies and Kielbasa:
- 1 pound kielbasa (smoked or Polish-style)
- 1 (16-ounce) package frozen pierogies (potato and cheddar or your favorite filling)
- Extra virgin olive oil
- Salt and freshly ground black pepper
For the Mustard Vinaigrette (Optional):
- 2 tablespoons Dijon mustard
- 2 tablespoons apple cider vinegar
- 1/4 cup extra virgin olive oil
- 2 tablespoons chopped fresh parsley
Instructions
- Preheat the Grill: Fire up your grill to medium heat.
- Grill the Kielbasa: Grill the kielbasa sausages until browned on all sides, about 8-10 minutes. Set aside and slice into bite-sized pieces.
- Prepare the Pierogies:
- Method 1: Straight from Frozen: Toss frozen pierogies with olive oil, salt, and pepper. Place directly on the preheated grill and cook for 5-7 minutes per side, or until golden brown and heated through.
- Method 2: With a Smoky Onion Twist: Thinly slice a red onion and toss it with olive oil, salt, and pepper along with the frozen pierogies. Grill both for 5-7 minutes per side until caramelized and cooked through.
- Optional Vinaigrette: In a small bowl, whisk together Dijon mustard, apple cider vinegar, and olive oil. Stir in chopped parsley.
- Assemble the Dish: In a large bowl, combine grilled pierogies (and onions, if using), sliced kielbasa, and the mustard vinaigrette. Toss everything until well coated.
- Serve: Garnish with a sprinkle of fresh parsley and serve hot with a dollop of sour cream on the side.
Notes
- For thicker pierogies, pre-boil for 2-3 minutes before grilling.
- Experiment with different pierogi fillings and kielbasa varieties.
- For a healthier version, use lighter pierogi fillings and turkey kielbasa.
- Prep Time: 10 minutes
- Cook Time: 20 minutes
- Category: Main Course
- Method: Grilling
- Cuisine: Polish
Keywords: Grilled pierogi, Grilled kielbasa, Polish street food, Smoked kielbasa, Smoked pierogi, Grilled dumplings, Kielbasa and pierogi recipe, Easy weeknight meal, Summer grilling recipe, Smoky vinaigrette, Pierogi fillings


